Running NextCloud on Raspberry Pi 4B and exposing it to the internet using Cloudflare
In this guide we will be setting up NextCloud on a Raspberry Pi 4B and exposing it to the internet using Cloudflare Tunnels. This guide assumes you have a Raspberry Pi 4B with Raspberry Pi OS installed and a domain name.
What is NextCloud and why would I want to use it?
NextCloud is like a self-hosted and open-source version of OneDrive / Google Drive. It allows you to store files, videos, photos, and more on your own server. It also has a lot of other features like calendar, contacts, notes and more! I wanted to set this up so I could have my own cloud storage without having to rely on a third party.
Prerequisites
- Raspberry Pi with Raspberry Pi OS installed
- Domain name
- Docker installed on your Raspberry Pi
- Cloudflare account with domain name added
- Basic knowledge of Docker and Linux
Setting up the Database
NextCloud uses a database to store all its data, the default is SQLite but this is not recommended to be used in production. We will be using PostgreSQL as the database. You can get PostgreSQL on your Raspberry Pi by running the following command:
docker pull postgres
Now you should have image for PostgreSQL. Next we need to create a network so that the NextCloud container can communicate with the PostgreSQL container. You can create a network by running the following command:
docker network create --driver bridge eko-nextcloud-net
This creates a network named eko-nextcloud-net. The name of the network can be anything you want.
--driver bridge specifies that the network should be a bridge network. eko-nextcloud-net is the name of the network. This command has now created a network that we can use to connect the NextCloud and PostgreSQL containers.
Before setting up NextCloud, we will need to set up our PostgreSQL database. Let's run the following command to create a PostgreSQL container:
docker run --name eko-postgres-db -v /mnt/data/postgres_db:/var/lib/postgresql/data -e POSTGRES_PASSWORD=123654 --network eko-nextcloud-net -d postgres
So what does this command do?
First it creates a container named eko-postgres-db using the postgres image. You can change the name of this container to whatever you want, but remember the name as we will need it later.
Then we specify the volume using the -v flag. The -v /mnt/data/postgres_db:/var/lib/postgresql/data flag mounts the /mnt/data/postgres_db directory on the host to the /var/lib/postgresql/data directory in the container. This is where the PostgreSQL data will be stored. You can change the path /mnt/data/postgres_db to whatever you want. I have it set up to store the data on an external ssd that automatically mounts on reboot.
The -e POSTGRES_PASSWORD=123654 flag sets the password for the default PostgreSQL user. You can change the password to whatever you want. We will need this password later when setting up NextCloud.
Next we have the --network eko-nextcloud-net flag. This connects the container to the eko-nextcloud-net network we created earlier. This allows the NextCloud container to communicate with the PostgreSQL container.
Finally, the -d flag runs the container in detached mode. This means the container will run in the background.
Setting up NextCloud
First we need to install NextCloud on our Raspberry Pi. You can run the following command on your pi to pull the NextCloud image:
docker pull nextcloud
Next we need to create a container for NextCloud, you can do this by running the following command:
docker run --name eko-nextcloud -d -p 8080:80 -v /mnt/data/nextcloud_data:/data --network eko-nextcloud-net -v /mnt/data/nextcloud:/var/www/html nextcloud
This will create a container named eko-nextcloud (you can change it to whatever you want), using the official NextCloud image nextcloud we pulled earlier.
Then we will map port 8080 on the host to port 80 in the container, which is the port used by NextCloud. You can also change 8080 to whatever port you want.
Next we specify the volume again using the -v flag, we will use this to store the NextCloud data. The -v /mnt/data/nextcloud_data:/data flag mounts the /mnt/data/nextcloud_data directory on the host to the /data directory in the container. This is where the NextCloud data and external storage will be stored. You can change the path /mnt/data/nextcloud_data to whatever you want.
Then we have the --network eko-nextcloud-net flag. This connects the container to the eko-nextcloud-net network we created earlier. This allows the NextCloud container to communicate with the PostgreSQL container.
After that, we will map another volume using the -v flag. This time we will map the /mnt/data/nextcloud directory on the host to the /var/www/html directory in the container. This is where the NextCloud files will be stored. You can change the path /mnt/data/nextcloud to whatever you want.
Setting up NextCloud account
Now that you have a running NextCloud instance, we can start by creating a NextCloud account. You can access your NextCloud instance by going to http://your-raspberry-pi-ip:8080 in your browser. You should see the NextCloud setup page.
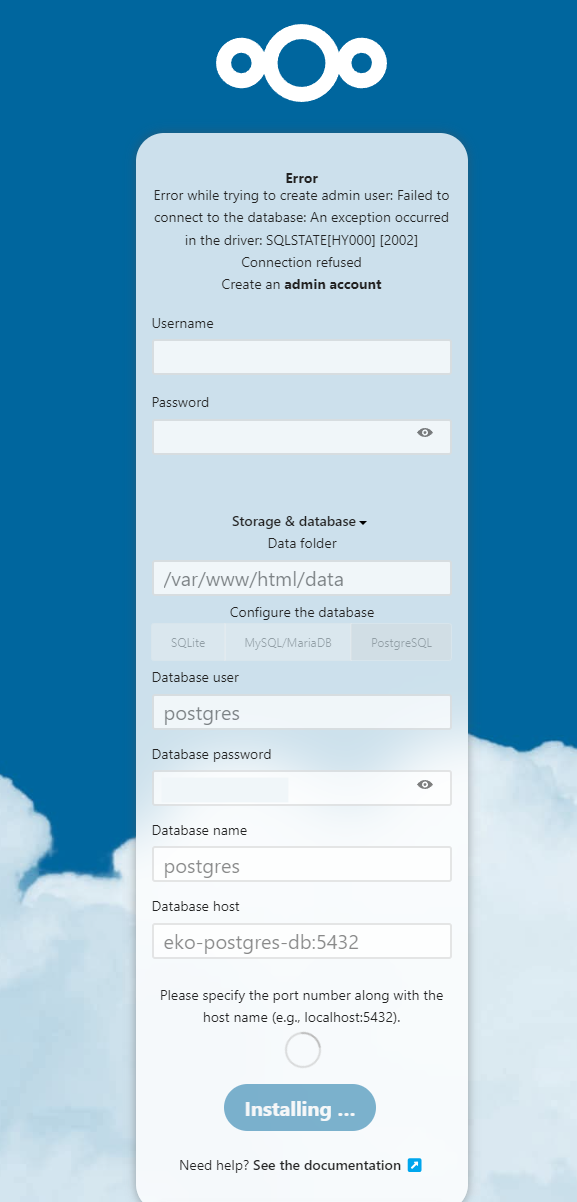
Here you will need to create an Admin account for NextCloud. You can set the username and password to whatever you want. Then select storage & database, you will need to enter the PostgreSQL database details here. The user should be the default postgres with the password that you chose. The default database name is also postgres and the database host should be the name of the PostgreSQL container you created earlier. In our case it is eko-postgres-db, followed by the port number 5432.
Make sure your postgres container is always running before you start the NextCloud container!
After you filled in everything, you can press install and let NextCloud do its thing. You should be redirected to the NextCloud dashboard once the installation is complete.
Setting up Cloudflare Tunnels
Now that NextCloud is set up, we can start setting up Cloudflare Tunnels. Cloudflare Tunnels allow you to expose your local web server to the internet without having to open ports on your router. We will use it to expose our NextCloud instance to the internet.
First thing you will have to do is create a new tunnel and run the connector on your Raspberry Pi. Here I will be using a tunnel in a Docker container. You can follow the steps below to create a new tunnel for your NextCloud instance:
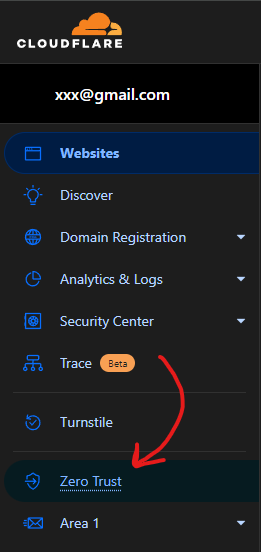
First go to Cloudflare and enter the zero trust tab.
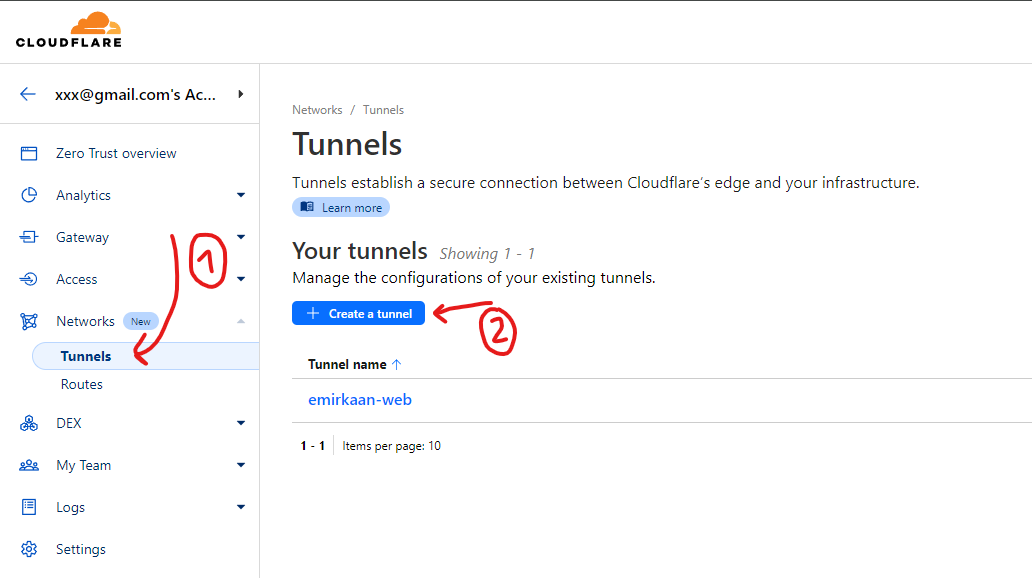
Then press the tunnel tab and create a new tunnel.
Choose the "Cloudflared" tunnel connector and press next, give your tunnel a name and press next again.
Then on the configure page, you will need to press "Docker" and copy the docker command to run the connector.
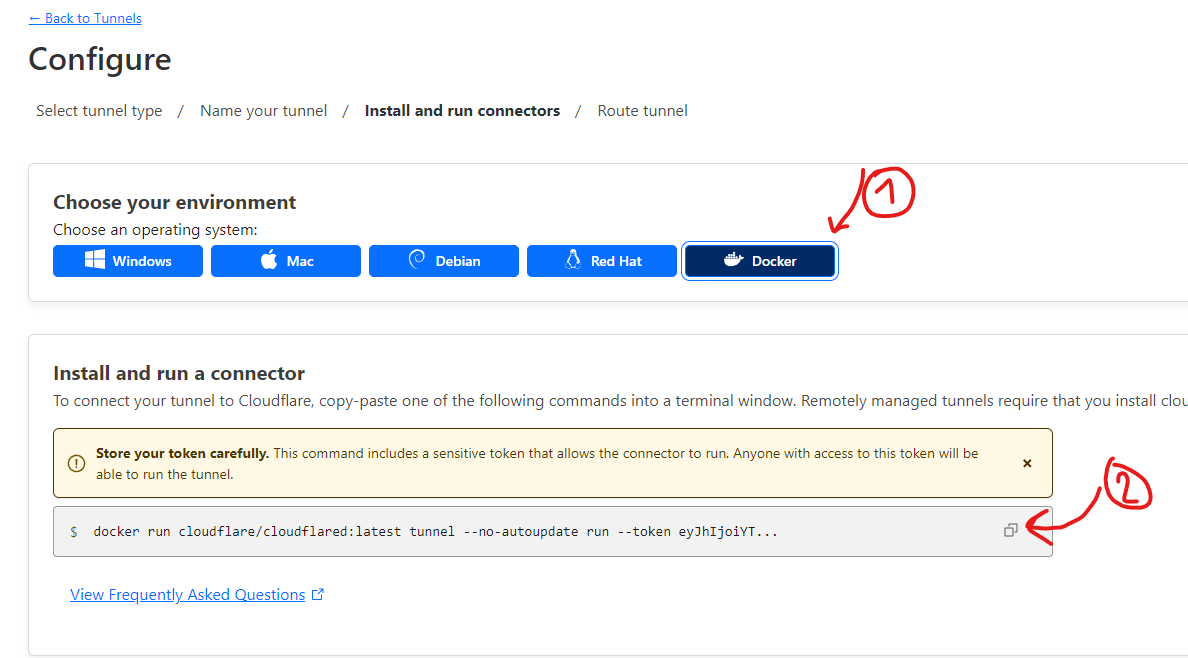
Next you will have to run this command on your Raspberry Pi. This will start the Cloudflare tunnel connector in a Docker container.
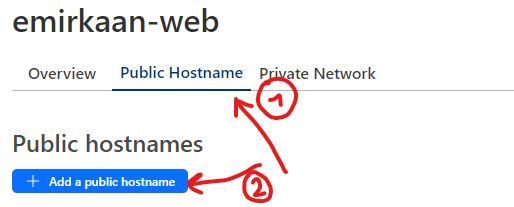
After you have the connector running, you have to go back to the Cloudflare tunnel dashboard and choose to configure your tunnel.
Then you will have to go to the public hostnames and add a new hostname for your NextCloud instance.
Choose a new hostname and pick your domain name. Then you will have to put the IP address of your Raspberry Pi and the port of your NextCloud instance.
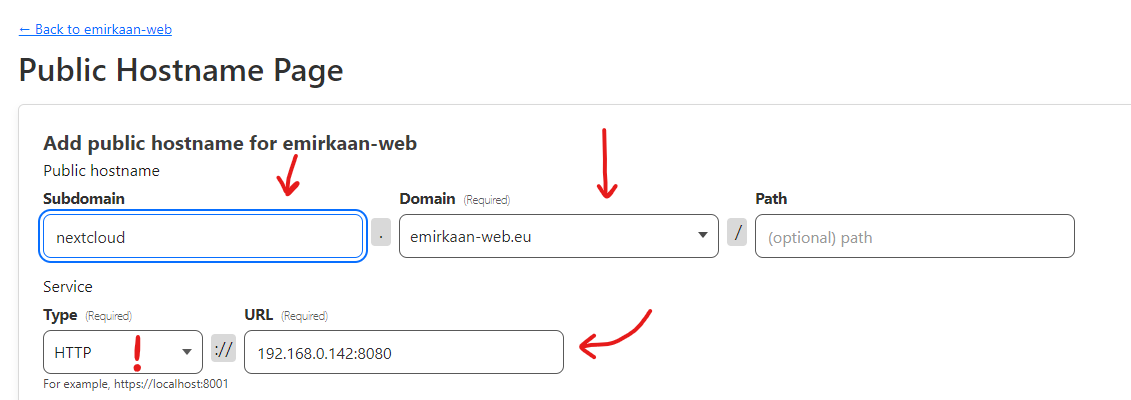
After you have done this, you can press save and your NextCloud instance should be accessible from the internet using the hostname you chose.
But wait there is still an issue, you can't access your NextCloud instance using the new hostname because it is not trusted by NextCloud. To fix this we will have to make some changes to the NextCloud config.
NextCloud Config
To fix the issue with the hostname not being trusted by NextCloud, you will have to add the new hostname to the trusted domains in the NextCloud config. The NextCloud config is located in the /mnt/data/nextcloud/config directory on your Raspberry Pi, which is the volume I mounted when running the container. You can edit the config file by running the following command:
sudo nano config.php
You will have to add and change a few things here:
'trusted_domains' =>
  array (
    0 => '192.168.0.142:8080',
    1 => 'yoursubdomain.your-domain.com', # Add this
  ),
'overwriteprotocol' => 'https', # Add this under 'Version'
'overwritehost' => 'yoursubdomain.your-domain.com', # Add this under 'overwriteprotocol'
Now you can restart your NextCloud container and your hostname should be trusted by NextCloud.
Conclusion
You should now have a running NextCloud instance on your Raspberry Pi and it should be accessible from the internet using Cloudflare Tunnels. You can now start uploading files, photos, videos and more to your own cloud storage!