Real Time Web Apps in .NET
There are a few ways to make a web app real time. You could make a button that refreshes the page, or you could use AJAX to update the page. But what if you want to update the page without the user having to do anything? Well, you could automatically make a request to the server every few seconds using something like setInterval in JavaScript, but that's not very efficient and it's not very 'real time'.
That's why a lot of people use WebSockets. WebSockets are a new technology that allows you to open a connection between the client and the server and keep it open. This allows the server to send data to the client without the client having to make a request.
To do this we can use a library called SignalR. SignalR is a library for .NET developers that makes it incredibly simple to add real-time web functionality to your applications. It's the ability to have your server-side code push content to the connected clients as it happens, in real-time. If WebSockets are available, SignalR will use them, otherwise it will fall back to other techniques like long polling or server-sent events.
Building a real time web app with SignalR
Let's use an example to demonstrate how SignalR works. We'll create a simple chat application that allows users to send messages to each other in real time.
Start by creating a new ASP.NET Core Web App (MVC), this includes the SignalR library by default. We'll call the project ChatApp. You can skip the other options for now.
Server Side
Firstly, you should create a new folder called Hubs and create a new class called ChatHub inside of it. This class will be used to send messages to the clients. This ChatHub class should inherit from Hub, which is imported with using Microsoft.AspNetCore.SignalR and have a method called SendMessage that takes two parameters, a string for the username and a string for the message.
using Microsoft.AspNetCore.SignalR;

namespace ChatApp.Hubs
{
    // Inherit from Hub class in SignalR
    public class ChatHub : Hub
    {
        public async Task SendMessage(string user, string message)
        {
            // Sends an event called "ReceiveMessage" to all clients with the user and message as parameters
            await Clients.All.SendAsync("ReceiveMessage", user, message);
        }
    }
}
We now have created a Hub that can be connected to by clients. We can now create a client to connect to this Hub. Before we can actually start using the hub we need to add something to tell the web app to use SignalR. We do this in the Program.cs file:
// Add SignalR to the web app
builder.Services.AddSignalR();
Now SignalR has been added to the web app, but our hub is not registered yet. We will register our ChatHub on the url /chathub. So we do that next in our Program.cs:
// Add this to the top of the file
using ChatApp.Hubs;

// Add the ChatHub to the app using the "/chat" path
app.MapHub<ChatHub>("/chat");
Client Side
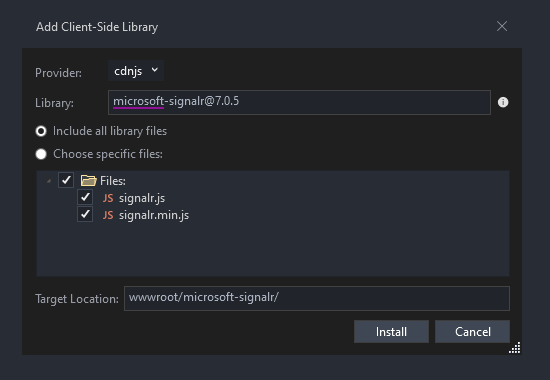
Now we can create a client to connect to this hub. To allow clients to connect, we will need to add the SignalR JavaScript library to our web app. We can do this by adding a new Client Side Library in Visual Studio. Right click on the wwwroot folder and click Add > Client-Side Library.... Then search for signalr and install the @microsoft/signalr package. This will add the SignalR JavaScript library to our web app.
Next we have to add the script to our _Layout.cshtml file, you can also choose to only add this on the pages that actually need to connect with SignalR.
<!-- Add SignalR -->
<script src="~/microsoft-signalr/signalr.min.js"></script>
Now we can create a new JavaScript file called chat.js in the wwwroot/js folder. This file will contain the code to connect to the hub and send messages to it. We will also add a function to receive messages from the hub.
"use strict"; // Use strict mode so we get errors if we make dumb mistakes

// Create a connection to the hub, using the "/chat" path that we registered in the Program.cs file
const connection = new signalR.HubConnectionBuilder().withUrl("/chat").build();

// Start the connection
connection.start().catch(function (err) {
	// If there is an error, log it to the console
	return console.error(err.toString());
});

// Add a function to run when we receive a message from the hub
connection.on("ReceiveMessage", function (user, message) {
	// Create a message with the user and message
	var msg = user + " says: " + message;

	// Create a new list item with the message and add it to the list of messages
	var li = document.createElement("li");
	li.textContent = msg;
	document.getElementById("messagesList").appendChild(li);
});

// Add a function to send messages to the hub when the send button is clicked
document
	.getElementById("sendButton")
	.addEventListener("click", function (event) {
		// Get the user and message from the input fields
		var user = document.getElementById("userInput").value;
		var message = document.getElementById("messageInput").value;

		// Send the message to the hub
		connection.invoke("SendMessage", user, message).catch(function (err) {
			return console.error(err.toString());
		});

		event.preventDefault();
	});
This code will connect to the hub and send messages to it. It will also add a function to receive messages from the hub and add them to the list of messages. Now add this script to the _Layout.cshtml file:
<script src="~/js/chat.js"></script>
Now we can add the HTML to our Index.cshtml file to display the messages and send messages to the hub. Don't forget to add the id attributes to the elements so we can select them in our JavaScript file. You can also add some CSS to make it look nice, in this example we will use the included Bootstrap CSS.
<div class="row">
	<div class="col-md-12">
		<div class="card">
			<div class="card-header">
				<h3>Chat</h3>
			</div>
			<div class="card-body">
				<!-- Our messages will be shown here -->
				<ul id="messagesList"></ul>
			</div>
			<div class="card-footer">
				<div class="input-group">
					<!-- We will get our username and message from these fields -->
					<input
						type="text"
						id="userInput"
						class="form-control"
						placeholder="Username"
					/>
					<input
						type="text"
						id="messageInput"
						class="form-control"
						placeholder="Message"
					/>
					<div class="input-group-append">
						<!-- When this button is clicked, we will send a message to the server -->
						<button id="sendButton" class="btn btn-primary">Send</button>
					</div>
				</div>
			</div>
		</div>
	</div>
</div>
Testing
That was it! Now we can run our web app and test it out. You can open the web app in multiple tabs to test it out. You should see something like this:

Conclusion
After following this tutorial you should have a basic understanding of how SignalR works and how you can use it in your own projects. For more info about SignalR, check out the official documentation by Microsoft.